
- Virtual Set Intro Tutorial
- Chroma Key Intro Tutorial
- Aquisition Concerns
- Advanced Virtual Sets
- Premiere Pro Tutorial
- vMix Tutorial
- After Effects Tutorial
- Final Cut Pro Tutorial
- Tricaster Tutorial
- Wirecast Virtual Set Tutorial
- Vegas Virtual Set Tutorial
- Virtual Set Pack Volume 9
- Virtual Set Pack Volume 8
- Virtual Set Pack Volume 7
- Virtual Set Pack Volume 6
- Virtual Set Pack Volume 5
- Virtual Set Pack Volume 4
- Volume Disks
- Volume Downloads
- Chromatte
- LiteSets Volume 1
- LiteSets Volume 2
- AnimSets Volume 3
- AnimSets Volume 2
- AnimSets Volume 1
- Virtual Set Pack Volume 3
- Virtual Set Pack Volume 2
- Virtual Set Pack Volume 1
Below is how this set looks in Photoshop, with those gradients mapping out the video locations and other layers like the desk and the screen frame matting them.
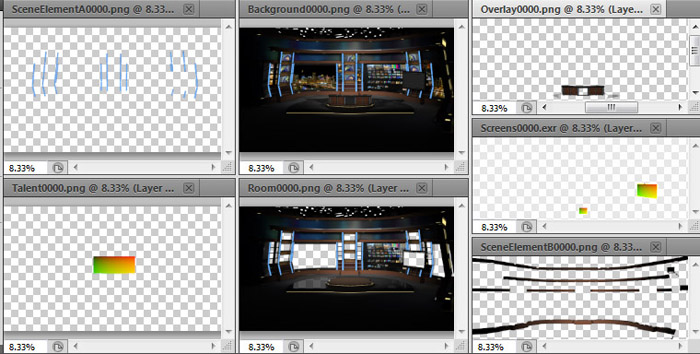
Below we can see what each of these layers looks like on it's own. There's a desk layer, one for the talent, screens, some color adjustment layers (if you want to change the color of those blue bars in VSE you just adjust the hue), a layer with the set without the desk and a number of hole where the screens are and a final background layer to catch anything missed.
The screens in this case don't use up all the holes and show through to the background layer, but if you as the user want to populate those with your own content it's easy to fill them in before heading off to Virtual Set editor.
When beginning an Open dialog is presented to you and one of the options is New Project > From Photoshop... Choose this and navigate to your saved file, or the original as the case may be and open it.
When you open the set in Virtual Set Editor it should looks like this: There will be an outline of a person over your whole set. This is a feature you won't be needing for this example but it's use is to allow you to have greater freedom of control over the talent placement than the built in placement that we are going to be using here. To make it go away uncheck the blue checkmark next to Input A1. Next, you are going to want to open the Input B panel (Click it) to access the screen input parameters and decide what you want for an input there.
Fire up the switcher and begin production with your virtual set. |
 Virtual Set Editor- To work with Virtual Set Editor we are going to use one of the sixteen angles from our Studio 159 set in Virtual Set Editor format to demonstrate how it works. These sets come as layered .psd files with specific layers defined to route video to that look like yellow, green, and red gradients.
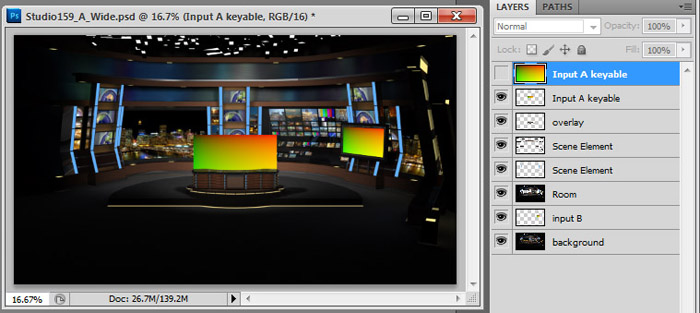
 Once satisfied with your work save it (making sure to leave it in 16 bit mode, this is what gives VSE enough color precision to correctly place the video on those gradients) and head off to Virtual Set Editor.
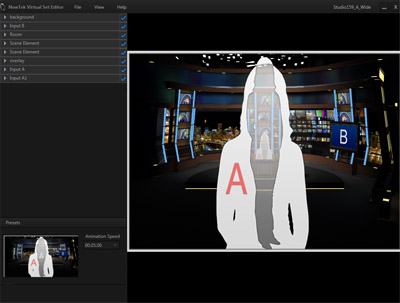
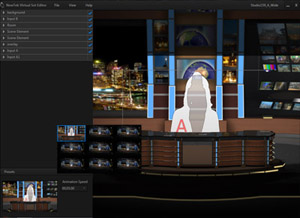
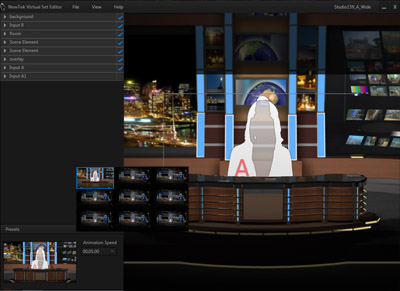 Next, we are going to set our presets. These are camera positions that you can call up in the switcher during production. Click on the image in the lower left to change to a different preset. Use the right mouse button and move the mouse to zoom in on the set. These sets have 150% more resolution than HD so you are able to zoom in quite a ways before breaking that 1:1 barrier.
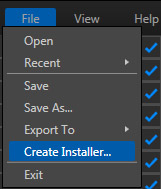 When you are done with your settings you can Export to Tricaster or create an installer if your Tricaster is located on another system than your Virtual Set Editor.